Chapter 3: Views and URLconfs
In the previous chapter, we explained how to set up a Django project and run the Django development server. In this chapter, you’ll learn the basics of creating dynamic Web pages with Django.
Your First Django-Powered Page: Hello World
As our first goal, let’s create a Web page that outputs that famous example message: “Hello world.”
If you were publishing a simple “Hello world” Web page without a Web framework, you’d simply type “Hello world” into a text file, call it hello.html, and upload it to a directory on a Web server somewhere. Notice, in that process, you’ve specified two key pieces of information about that Web page: its contents (the string "Hello world") and its URL ( http://www.example.com/hello.html, or maybe http://www.example.com/files/hello.html if you put it in a subdirectory).
With Django, you specify those same two things, but in a different way. The contents of the page are produced by a view function, and the URL is specified in a URLconf. First, let’s write our “Hello world” view function.
Your First View
Within the mysite directory that django-admin.py startproject made in the last chapter, create an empty file called views.py. This Python module will contain our views for this chapter. Note that there’s nothing special about the name views.py – Django doesn’t care what the file is called, as you’ll see in a bit – but it’s a good idea to call it views.py as a convention, for the benefit of other developers reading your code.
Our “Hello world” view is simple. Here’s the entire function, plus import statements, which you should type into the views.py file:
from django.http import HttpResponse

def hello(request):
    return HttpResponse("Hello world")
Let’s step through this code one line at a time:
First, we import the class HttpResponse, which lives in the django.http module. We need to import this class because it’s used later in our code.
Next, we define a function called hello – the view function.
Each view function takes at least one parameter, called request by convention. This is an object that contains information about the current Web request that has triggered this view, and it’s an instance of the class django.http.HttpRequest. In this example, we don’t do anything with request, but it must be the first parameter of the view nonetheless.
Note that the name of the view function doesn’t matter; it doesn’t have to be named in a certain way in order for Django to recognize it. We’re calling it hello here, because that name clearly indicates the gist of the view, but it could just as well be named hello_wonderful_beautiful_world, or something equally revolting. The next section, “Your First URLconf”, will shed light on how Django finds this function.
The function is a simple one-liner: it merely returns an HttpResponse object that has been instantiated with the text "Hello world".
The main lesson here is this: a view is just a Python function that takes an HttpRequest as its first parameter and returns an instance of HttpResponse. In order for a Python function to be a Django view, it must do these two things. (There are exceptions, but we’ll get to those later.)
Your First URLconf
If, at this point, you ran python manage.py runserver again, you’d still see the “Welcome to Django” message, with no trace of our “Hello world” view anywhere. That’s because our mysite project doesn’t yet know about the hello view; we need to tell Django explicitly that we’re activating this view at a particular URL. (Continuing our previous analogy of publishing static HTML files, at this point we’ve created the HTML file but haven’t uploaded it to a directory on the server yet.) To hook a view function to a particular URL with Django, use a URLconf.
A URLconf is like a table of contents for your Django-powered Web site. Basically, it’s a mapping between URLs and the view functions that should be called for those URLs. It’s how you tell Django, “For this URL, call this code, and for that URL, call that code.” For example, “When somebody visits the URL /foo/, call the view function foo_view(), which lives in the Python module views.py.”
When you executed django-admin.py startproject in the previous chapter, the script created a URLconf for you automatically: the file urls.py. By default, it looks something like this:
from django.conf.urls import patterns, include, url

# Uncomment the next two lines to enable the admin:
# from django.contrib import admin
# admin.autodiscover()

urlpatterns = patterns('',
    # Examples:
    # url(r'^$', 'mysite.views.home', name='home'),
    # url(r'^mysite/', include('mysite.foo.urls')),

    # Uncomment the admin/doc line below to enable admin documentation:
    # url(r'^admin/doc/', include('django.contrib.admindocs.urls')),

    # Uncomment the next line to enable the admin:
    # url(r'^admin/', include(admin.site.urls)),
)
This default URLconf includes some commonly used Django features commented out, so that activating those features is as easy as uncommenting the appropriate lines. If we ignore the commented-out code, here’s the essence of a URLconf:
from django.conf.urls.defaults import patterns, include, url

urlpatterns = patterns('',
)
Let’s step through this code one line at a time:
- The first line imports three functions from the django.conf.urls.defaults module, which is Django’s URLconf infrastructure: patterns, include, and urls.
- The second line calls the function patterns and saves the result into a variable called urlpatterns. The patterns function gets passed only a single argument – the empty string. (The string can be used to supply a common prefix for view functions, which we’ll cover in Chapter 8: Advanced Views and URLconfs.)
The main thing to note here is the variable urlpatterns, which Django expects to find in your URLconf module. This variable defines the mapping between URLs and the code that handles those URLs. By default, as we can see, the URLconf is empty – your Django application is a blank slate. (As a side note, that’s how Django knew to show you the “Welcome to Django” page in the last chapter. If your URLconf is empty, Django assumes you just started a new project and, hence, displays that message.)
To add a URL and view to the URLconf, just add a mapping between a URL pattern and the view function. Here’s how to hook in our hello view:
from django.conf.urls.defaults import patterns, include, url
from mysite.views import hello

urlpatterns = patterns('',
    url(r'^hello/$', hello),
)
(Note that we’ve removed the commented-out code for brevity. You can choose to leave those lines in, if you’d like.)
We made two changes here:
- First, we imported the hello view from its module – mysite/views.py, which translates into mysite.views in Python import syntax. (This assumes mysite/views.py is on your Python path; see the sidebar for details.)
- Next, we added the line url(r'^hello/$', hello), to urlpatterns. This line is referred to as a URLpattern. The url() function tells Django how to handle the url that you are configuring. The first argument is a pattern-matching string (a regular expression; more on this in a bit) and the second argument is the view function to use for that pattern. url() can take other optional arguments as well, which we’ll cover in more depth in Chapter 8: Advanced Views and URLconfs.
Note
One more important detail we’ve introduced here is that r character in front of the regular expression string. This tells Python that the string is a “raw string” – its contents should not interpret backslashes. In normal Python strings, backslashes are used for escaping special characters – such as in the string '\n', which is a one-character string containing a newline. When you add the r to make it a raw string, Python does not apply its backslash escaping – so, r'\n' is a two-character string containing a literal backslash and a lowercase “n”. There’s a natural collision between Python’s usage of backslashes and the backslashes that are found in regular expressions, so it’s strongly suggested that you use raw strings any time you’re defining a regular expression in Python. All of the URLpatterns in this book will be raw strings.
In a nutshell, we just told Django that any request to the URL /hello/ should be handled by the hello view function.
Your Python Path
Your Python path is the list of directories on your system where Python looks when you use the Python import statement.
For example, let’s say your Python path is set to ['', '/usr/lib/python2.7/site-packages', '/home/username/djcode']. If you execute the Python statement from foo import bar, Python will look for a module called foo.py in the current directory. (The first entry in the Python path, an empty string, means “the current directory.”) If that file doesn’t exist, Python will look for the file /usr/lib/python2.7/site-packages/foo.py. If that file doesn’t exist, it will try /home/username/djcode/foo.py. Finally, if that file doesn’t exist, it will raise ImportError.
If you’re interested in seeing the value of your Python path, start the Python interactive interpreter and type this:
>>> import sys
>>> print sys.path
Generally you don’t have to worry about setting your Python path – Python and Django take care of things for you automatically behind the scenes. (Setting the Python path is one of the things that the manage.py script does.)
It’s worth discussing the syntax of this URLpattern, as it may not be immediately obvious. Although we want to match the URL /hello/, the pattern looks a bit different than that. Here’s why:
Django removes the slash from the front of every incoming URL before it checks the URLpatterns. This means that our URLpattern doesn’t include the leading slash in /hello/. (At first, this may seem unintuitive, but this requirement simplifies things – such as the inclusion of URLconfs within other URLconfs, which we’ll cover in Chapter 8.)
The pattern includes a caret (^) and a dollar sign ($). These are regular expression characters that have a special meaning: the caret means “require that the pattern matches the start of the string,” and the dollar sign means “require that the pattern matches the end of the string.”
This concept is best explained by example. If we had instead used the pattern '^hello/' (without a dollar sign at the end), then any URL starting with /hello/ would match, such as /hello/foo and /hello/bar, not just /hello/. Similarly, if we had left off the initial caret character (i.e., 'hello/$'), Django would match any URL that ends with hello/, such as /foo/bar/hello/. If we had simply used hello/, without a caret or dollar sign, then any URL containing hello/ would match, such as /foo/hello/bar. Thus, we use both the caret and dollar sign to ensure that only the URL /hello/ matches – nothing more, nothing less.
Most of your URLpatterns will start with carets and end with dollar signs, but it’s nice to have the flexibility to perform more sophisticated matches.
You may be wondering what happens if someone requests the URL /hello (that is, without a trailing slash). Because our URLpattern requires a trailing slash, that URL would not match. However, by default, any request to a URL that doesn’t match a URLpattern and doesn’t end with a slash will be redirected to the same URL with a trailing slash. (This is regulated by the APPEND_SLASH Django setting, which is covered in Appendix D.)
If you’re the type of person who likes all URLs to end with slashes (which is the preference of Django’s developers), all you’ll need to do is add a trailing slash to each URLpattern and leave APPEND_SLASH set to True. If you prefer your URLs not to have trailing slashes, or if you want to decide it on a per-URL basis, set APPEND_SLASH to False and put trailing slashes in your URLpatterns as you see fit.
The other thing to note about this URLconf is that we’ve passed the hello view function as an object without calling the function. This is a key feature of Python (and other dynamic languages): functions are first-class objects, which means you can pass them around just like any other variables. Cool stuff, eh?
To test our changes to the URLconf, start the Django development server, as you did in Chapter 2, by running the command python manage.py runserver. (If you left it running, that’s fine, too. The development server automatically detects changes to your Python code and reloads as necessary, so you don’t have to restart the server between changes.) The server is running at the address http://127.0.0.1:8000/, so open up a Web browser and go to http://127.0.0.1:8000/hello/. You should see the text “Hello world” – the output of your Django view.
Hooray! You’ve made your first Django-powered Web page.
Regular Expressions
Regular expressions (or regexes) are a compact way of specifying patterns in text. While Django URLconfs allow arbitrary regexes for powerful URL matching, you’ll probably only use a few regex symbols in practice. Here’s a selection of common symbols:
| Symbol | Matches |
|---|---|
| . (dot) | Any single character |
| \d | Any single digit |
| [A-Z] | Any character between A and Z (uppercase) |
| [a-z] | Any character between a and z (lowercase) |
| [A-Za-z] | Any character between a and z (case-insensitive) |
| + | One or more of the previous expression (e.g., \d+ matches one or more digits) |
| [^/]+ | One or more characters until (and not including) a forward slash |
| ? | Zero or one of the previous expression (e.g., \d? matches zero or one digits) |
| * | Zero or more of the previous expression (e.g., \d* matches zero, one or more than one digit) |
| {1,3} | Between one and three (inclusive) of the previous expression (e.g., \d{1,3} matches one, two or three digits) |
For more on regular expressions, see http://www.djangoproject.com/r/python/re-module/.
A Quick Note About 404 Errors
At this point, our URLconf defines only a single URLpattern: the one that handles requests to the URL /hello/. What happens when you request a different URL?
To find out, try running the Django development server and visiting a page such as http://127.0.0.1:8000/goodbye/ or http://127.0.0.1:8000/hello/subdirectory/, or even http://127.0.0.1:8000/ (the site “root”). You should see a “Page not found” message (see Figure 3-1). Django displays this message because you requested a URL that’s not defined in your URLconf.
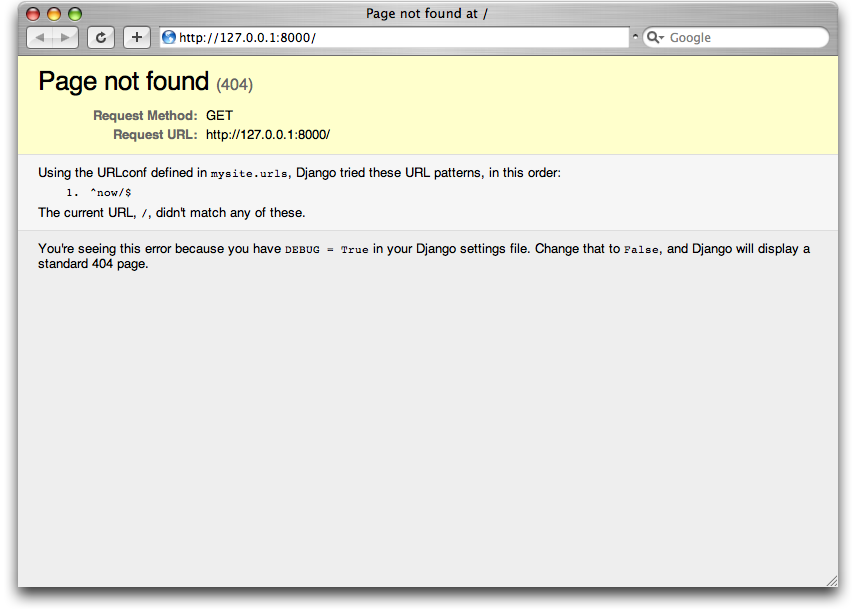
Figure 3-1. Django’s 404 page
The utility of this page goes beyond the basic 404 error message. It also tells you precisely which URLconf Django used and every pattern in that URLconf. From that information, you should be able to tell why the requested URL threw a 404.
Naturally, this is sensitive information intended only for you, the Web developer. If this were a production site deployed live on the Internet, you wouldn’t want to expose that information to the public. For that reason, this “Page not found” page is only displayed if your Django project is in debug mode. We’ll explain how to deactivate debug mode later. For now, just know that every Django project is in debug mode when you first create it, and if the project is not in debug mode, Django outputs a different 404 response.
A Quick Note About The Site Root
As explained in the last section, you’ll see a 404 error message if you view the site root – http://127.0.0.1:8000/. Django doesn’t add magically anything to the site root; that URL is not special-cased in any way. It’s up to you to assign it to a URLpattern, just like every other entry in your URLconf.
The URLpattern to match the site root is a bit unintuitive, though, so it’s worth mentioning. When you’re ready to implement a view for the site root, use the URLpattern '^$', which matches an empty string. For example:
from mysite.views import hello, my_homepage_view

urlpatterns = patterns('',
    url(r'^$', my_homepage_view),
    # ...
)
How Django Processes a Request
Before continuing to our second view function, let’s pause to learn a little more about how Django works. Specifically, when you view your “Hello world” message by visiting http://127.0.0.1:8000/hello/ in your Web browser, what does Django do behind the scenes?
It all starts with the settings file. When you run python manage.py runserver, the script looks for a file called settings.py in the inner mysite directory. This file contains all sorts of configuration for this particular Django project, all in uppercase: TEMPLATE_DIRS, DATABASES, etc. The most important setting is called ROOT_URLCONF. ROOT_URLCONF tells Django which Python module should be used as the URLconf for this Web site.
Remember when django-admin.py startproject created the files settings.py and urls.py? The autogenerated settings.py contains a ROOT_URLCONF setting that points to the autogenerated urls.py. Open the settings.py file and see for yourself; it should look like this:
ROOT_URLCONF = 'mysite.urls'
This corresponds to the file mysite/urls.py.
When a request comes in for a particular URL – say, a request for /hello/ – Django loads the URLconf pointed to by the ROOT_URLCONF setting. Then it checks each of the URLpatterns in that URLconf, in order, comparing the requested URL with the patterns one at a time, until it finds one that matches. When it finds one that matches, it calls the view function associated with that pattern, passing it an HttpRequest object as the first parameter. (We’ll cover the specifics of HttpRequest later.)
As we saw in our first view example, a view function must return an HttpResponse. Once it does this, Django does the rest, converting the Python object to a proper Web response with the appropriate HTTP headers and body (i.e., the content of the Web page).
In summary:
- A request comes in to /hello/.
- Django determines the root URLconf by looking at the ROOT_URLCONF setting.
- Django looks at all of the URLpatterns in the URLconf for the first one that matches /hello/.
- If it finds a match, it calls the associated view function.
- The view function returns an HttpResponse.
- Django converts the HttpResponse to the proper HTTP response, which results in a Web page.
You now know the basics of how to make Django-powered pages. It’s quite simple, really – just write view functions and map them to URLs via URLconfs.
Your Second View: Dynamic Content
Our “Hello world” view was instructive in demonstrating the basics of how Django works, but it wasn’t an example of a dynamic Web page, because the content of the page are always the same. Every time you view /hello/, you’ll see the same thing; it might as well be a static HTML file.
For our second view, let’s create something more dynamic – a Web page that displays the current date and time. This is a nice, simple next step, because it doesn’t involve a database or any user input – just the output of your server’s internal clock. It’s only marginally more exciting than “Hello world,” but it’ll demonstrate a few new concepts.
This view needs to do two things: calculate the current date and time, and return an HttpResponse containing that value. If you have experience with Python, you know that Python includes a datetime module for calculating dates. Here’s how to use it:
>>> import datetime
>>> now = datetime.datetime.now()
>>> now
datetime.datetime(2008, 12, 13, 14, 9, 39, 2731)
>>> print now
2008-12-13 14:09:39.002731
That’s simple enough, and it has nothing to do with Django. It’s just Python code. (We want to emphasize that you should be aware of what code is “just Python” vs. code that is Django-specific. As you learn Django, we want you to be able to apply your knowledge to other Python projects that don’t necessarily use Django.)
To make a Django view that displays the current date and time, then, we just need to hook this datetime.datetime.now() statement into a view and return an HttpResponse. Here’s how that looks:
from django.http import HttpResponse
import datetime

def current_datetime(request):
    now = datetime.datetime.now()
    html = "<html><body>It is now %s.</body></html>" % now
    return HttpResponse(html)
As with our hello view function, this should live in views.py. Note that we’ve hidden the hello function from this example for brevity, but for the sake of completeness, here’s what the entire views.py looks like:
from django.http import HttpResponse
import datetime

def hello(request):
    return HttpResponse("Hello world")

def current_datetime(request):
    now = datetime.datetime.now()
    html = "<html><body>It is now %s.</body></html>" % now
    return HttpResponse(html)
(From now on, we won’t display previous code in code examples, except when necessary. You should be able to tell from context which parts of an example are new vs. old.)
Let’s step through the changes we’ve made to views.py to accommodate the current_datetime view.
We’ve added an import datetime to the top of the module, so we can calculate dates.
The new current_datetime function calculates the current date and time, as a datetime.datetime object, and stores that as the local variable now.
The second line of code within the view constructs an HTML response using Python’s “format-string” capability. The %s within the string is a placeholder, and the percent sign after the string means “Replace the %s in the preceding string with the value of the variable now.” The now variable is technically a datetime.datetime object, not a string, but the %s format character converts it to its string representation, which is something like "2008-12-13 14:09:39.002731". This will result in an HTML string such as "<html><body>It is now 2008-12-13 14:09:39.002731.</body></html>".
(Yes, our HTML is invalid, but we’re trying to keep the example simple and short.)
Finally, the view returns an HttpResponse object that contains the generated response – just as we did in hello.
After adding that to views.py, add the URLpattern to urls.py to tell Django which URL should handle this view. Something like /time/ would make sense:
from django.conf.urls.defaults import patterns, include, url
from mysite.views import hello, current_datetime

urlpatterns = patterns('',
    url(r'^hello/$', hello),
    url(r'^time/$', current_datetime),
)
We’ve made two changes here. First, we imported the current_datetime function at the top. Second, and more importantly, we added a URLpattern mapping the URL /time/ to that new view. Getting the hang of this?
With the view written and URLconf updated, fire up the runserver and visit http://127.0.0.1:8000/time/ in your browser. You should see the current date and time.
Django’s Time Zone
Depending on your computer, the date and time may be a few hours off. That’s because Django is time zone-aware and defaults to the America/Chicago time zone. (It has to default to something, and that’s the time zone where the original developers live.) If you live elsewhere, you’ll want to change it in settings.py. See the comment in that file for a link to an up-to-date list of worldwide time zone options.
URLconfs and Loose Coupling
Now’s a good time to highlight a key philosophy behind URLconfs and behind Django in general: the principle of loose coupling. Simply put, loose coupling is a software-development approach that values the importance of making pieces interchangeable. If two pieces of code are loosely coupled, then changes made to one of the pieces will have little or no effect on the other.
Django’s URLconfs are a good example of this principle in practice. In a Django web application, the URL definitions and the view functions they call are loosely coupled; that is, the decision of what the URL should be for a given function, and the implementation of the function itself, reside in two separate places. This lets you switch out one piece without affecting the other.
For example, consider our current_datetime view. If we wanted to change the URL for the application – say, to move it from /time/ to /current-time/ – we could make a quick change to the URLconf, without having to worry about the view itself. Similarly, if we wanted to change the view function – altering its logic somehow – we could do that without affecting the URL to which the function is bound.
Furthermore, if we wanted to expose the current-date functionality at several URLs, we could easily take care of that by editing the URLconf, without having to touch the view code. In this example, our current_datetime is available at two URLs. It’s a contrived example, but this technique can come in handy:
urlpatterns = patterns('',
    url(r'^hello/$', hello),
    url(r'^time/$', current_datetime),
    url(r'^another-time-page/$', current_datetime),
)
URLconfs and views are loose coupling in action. We’ll continue to point out examples of this important philosophy throughout this book.
Your Third View: Dynamic URLs
In our current_datetime view, the contents of the page – the current date/time – were dynamic, but the URL (/time/) was static. In most dynamic Web applications, though, a URL contains parameters that influence the output of the page. For example, an online bookstore might give each book its own URL, like /books/243/ and /books/81196/.
Let’s create a third view that displays the current date and time offset by a certain number of hours. The goal is to craft a site in such a way that the page /time/plus/1/ displays the date/time one hour into the future, the page /time/plus/2/ displays the date/time two hours into the future, the page /time/plus/3/ displays the date/time three hours into the future, and so on.
A novice might think to code a separate view function for each hour offset, which might result in a URLconf like this:
urlpatterns = patterns('',
    url(r'^time/$', current_datetime),
    url(r'^time/plus/1/$', one_hour_ahead),
    url(r'^time/plus/2/$', two_hours_ahead),
    url(r'^time/plus/3/$', three_hours_ahead),
    url(r'^time/plus/4/$', four_hours_ahead),
)
Clearly, this line of thought is flawed. Not only would this result in redundant view functions, but also the application is fundamentally limited to supporting only the predefined hour ranges – one, two, three or four hours. If we decided to create a page that displayed the time five hours into the future, we’d have to create a separate view and URLconf line for that, furthering the duplication. We need to do some abstraction here.
A Word About Pretty URLs
If you’re experienced in another Web development platform, such as PHP or Java, you may be thinking, “Hey, let’s use a query string parameter!” – something like /time/plus?hours=3, in which the hours would be designated by the hours parameter in the URL’s query string (the part after the ?).
You can do that with Django (and we’ll tell you how in Chapter 7), but one of Django’s core philosophies is that URLs should be beautiful. The URL /time/plus/3/ is far cleaner, simpler, more readable, easier to recite to somebody aloud and . . . just plain prettier than its query string counterpart. Pretty URLs are a characteristic of a quality Web application.
Django’s URLconf system encourages pretty URLs by making it easier to use pretty URLs than not to.
How, then do we design our application to handle arbitrary hour offsets? The key is to use wildcard URLpatterns. As we mentioned previously, a URLpattern is a regular expression; hence, we can use the regular expression pattern \d+ to match one or more digits:
urlpatterns = patterns('',
    # ...
    url(r'^time/plus/\d+/$', hours_ahead),
    # ...
)
(We’re using the # ... to imply there might be other URLpatterns that we trimmed from this example.)
This new URLpattern will match any URL such as /time/plus/2/, /time/plus/25/, or even /time/plus/100000000000/. Come to think of it, let’s limit it so that the maximum allowed offset is 99 hours. That means we want to allow either one- or two-digit numbers – and in regular expression syntax, that translates into \d{1,2}:
url(r'^time/plus/\d{1,2}/$', hours_ahead),
Note
When building Web applications, it’s always important to consider the most outlandish data input possible, and decide whether or not the application should support that input. We’ve curtailed the outlandishness here by limiting the offset to 99 hours.
Now that we’ve designated a wildcard for the URL, we need a way of passing that wildcard data to the view function, so that we can use a single view function for any arbitrary hour offset. We do this by placing parentheses around the data in the URLpattern that we want to save. In the case of our example, we want to save whatever number was entered in the URL, so let’s put parentheses around the \d{1,2}, like this:
url(r'^time/plus/(\d{1,2})/$', hours_ahead),
If you’re familiar with regular expressions, you’ll be right at home here; we’re using parentheses to capture data from the matched text.
The final URLconf, including our previous two views, looks like this:
from django.conf.urls.defaults import *
from mysite.views import hello, current_datetime, hours_ahead

urlpatterns = patterns('',
    url(r'^hello/$', hello),
    url(r'^time/$', current_datetime),
    url(r'^time/plus/(\d{1,2})/$', hours_ahead),
)
With that taken care of, let’s write the hours_ahead view.
hours_ahead is very similar to the current_datetime view we wrote earlier, with a key difference: it takes an extra argument, the number of hours of offset. Here’s the view code:
from django.http import Http404, HttpResponse
import datetime

def hours_ahead(request, offset):
    try:
        offset = int(offset)
    except ValueError:
        raise Http404()
    dt = datetime.datetime.now() + datetime.timedelta(hours=offset)
    html = "<html><body>In %s hour(s), it will be %s.</body></html>" % (offset, dt)
    return HttpResponse(html)
Let’s step through this code one line at a time:
The view function, hours_ahead, takes two parameters: request and offset.
request is an HttpRequest object, just as in hello and current_datetime. We’ll say it again: each view always takes an HttpRequest object as its first parameter.
offset is the string captured by the parentheses in the URLpattern. For example, if the requested URL were /time/plus/3/, then offset would be the string '3'. If the requested URL were /time/plus/21/, then offset would be the string '21'. Note that captured values will always be strings, not integers, even if the string is composed of only digits, such as '21'.
(Technically, captured values will always be Unicode objects, not plain Python bytestrings, but don’t worry about this distinction at the moment.)
We decided to call the variable offset, but you can call it whatever you’d like, as long as it’s a valid Python identifier. The variable name doesn’t matter; all that matters is that it’s the second argument to the function, after request. (It’s also possible to use keyword, rather than positional, arguments in an URLconf. We cover that in Chapter 8.)
The first thing we do within the function is call int() on offset. This converts the string value to an integer.
Note that Python will raise a ValueError exception if you call int() on a value that cannot be converted to an integer, such as the string 'foo'. In this example, if we encounter the ValueError, we raise the exception django.http.Http404, which, as you can imagine, results in a 404 “Page not found” error.
Astute readers will wonder: how could we ever reach the ValueError case, anyway, given that the regular expression in our URLpattern – (\d{1,2}) – captures only digits, and therefore offset will only ever be a string composed of digits? The answer is, we won’t, because the URLpattern provides a modest but useful level of input validation, but we still check for the ValueError in case this view function ever gets called in some other way. It’s good practice to implement view functions such that they don’t make any assumptions about their parameters. Loose coupling, remember?
In the next line of the function, we calculate the current date/time and add the appropriate number of hours. We’ve already seen datetime.datetime.now() from the current_datetime view; the new concept here is that you can perform date/time arithmetic by creating a datetime.timedelta object and adding to a datetime.datetime object. Our result is stored in the variable dt.
This line also shows why we called int() on offset – the datetime.timedelta function requires the hours parameter to be an integer.
Next, we construct the HTML output of this view function, just as we did in current_datetime. A small difference in this line from the previous line is that it uses Python’s format-string capability with two values, not just one. Hence, there are two %s symbols in the string and a tuple of values to insert: (offset, dt).
Finally, we return an HttpResponse of the HTML. By now, this is old hat.
With that view function and URLconf written, start the Django development server (if it’s not already running), and visit http://127.0.0.1:8000/time/plus/3/ to verify it works. Then try http://127.0.0.1:8000/time/plus/5/. Then http://127.0.0.1:8000/time/plus/24/. Finally, visit http://127.0.0.1:8000/time/plus/100/ to verify that the pattern in your URLconf only accepts one- or two-digit numbers; Django should display a “Page not found” error in this case, just as we saw in the section “A Quick Note About 404 Errors” earlier. The URL http://127.0.0.1:8000/time/plus/ (with no hour designation) should also throw a 404.
Coding Order
In this example, we wrote the URLpattern first and the view second, but in the previous examples, we wrote the view first, then the URLpattern. Which technique is better?
Well, every developer is different.
If you’re a big-picture type of person, it may make the most sense to you to write all of the URLpatterns for your application at the same time, at the start of your project, and then code up the views. This has the advantage of giving you a clear to-do list, and it essentially defines the parameter requirements for the view functions you’ll need to write.
If you’re more of a bottom-up developer, you might prefer to write the views first, and then anchor them to URLs afterward. That’s OK, too.
In the end, it comes down to which technique fits your brain the best. Both approaches are valid.
Django’s Pretty Error Pages
Take a moment to admire the fine Web application we’ve made so far . . . now let’s break it! Let’s deliberately introduce a Python error into our views.py file by commenting out the offset = int(offset) lines in the hours_ahead view:
def hours_ahead(request, offset):
    # try:
    #     offset = int(offset)
    # except ValueError:
    #     raise Http404()
    dt = datetime.datetime.now() + datetime.timedelta(hours=offset)
    html = "<html><body>In %s hour(s), it will be %s.</body></html>" % (offset, dt)
    return HttpResponse(html)
Load up the development server and navigate to /time/plus/3/. You’ll see an error page with a significant amount of information, including a TypeError message displayed at the very top: "unsupported type for timedelta hours component: unicode".
What happened? Well, the datetime.timedelta function expects the hours parameter to be an integer, and we commented out the bit of code that converted offset to an integer. That caused datetime.timedelta to raise the TypeError. It’s the typical kind of small bug that every programmer runs into at some point.
The point of this example was to demonstrate Django’s error pages. Take some time to explore the error page and get to know the various bits of information it gives you.
Here are some things to notice:
At the top of the page, you get the key information about the exception: the type of exception, any parameters to the exception (the "unsupported type" message in this case), the file in which the exception was raised, and the offending line number.
Under the key exception information, the page displays the full Python traceback for this exception. This is similar to the standard traceback you get in Python’s command-line interpreter, except it’s more interactive. For each level (“frame”) in the stack, Django displays the name of the file, the function/method name, the line number, and the source code of that line.
Click the line of source code (in dark gray), and you’ll see several lines from before and after the erroneous line, to give you context.
Click “Local vars” under any frame in the stack to view a table of all local variables and their values, in that frame, at the exact point in the code at which the exception was raised. This debugging information can be a great help.
Note the “Switch to copy-and-paste view” text under the “Traceback” header. Click those words, and the traceback will switch to a alternate version that can be easily copied and pasted. Use this when you want to share your exception traceback with others to get technical support – such as the kind folks in the Django IRC chat room or on the Django users mailing list.
Underneath, the “Share this traceback on a public Web site” button will do this work for you in just one click. Click it to post the traceback to http://www.dpaste.com/, where you’ll get a distinct URL that you can share with other people.
Next, the “Request information” section includes a wealth of information about the incoming Web request that spawned the error: GET and POST information, cookie values, and meta information, such as CGI headers. Appendix G has a complete reference of all the information a request object contains.
Below the “Request information” section, the “Settings” section lists all of the settings for this particular Django installation. (We’ve already mentioned ROOT_URLCONF, and we’ll show you various Django settings throughout the book. All the available settings are covered in detail in Appendix D.)
The Django error page is capable of displaying more information in certain special cases, such as the case of template syntax errors. We’ll get to those later, when we discuss the Django template system. For now, uncomment the offset = int(offset) lines to get the view function working properly again.
Are you the type of programmer who likes to debug with the help of carefully placed print statements? You can use the Django error page to do so – just without the print statements. At any point in your view, temporarily insert an assert False to trigger the error page. Then, you can view the local variables and state of the program. Here’s an example, using the hours_ahead view:
def hours_ahead(request, offset):
    try:
        offset = int(offset)
    except ValueError:
        raise Http404()
    dt = datetime.datetime.now() + datetime.timedelta(hours=offset)
    assert False
    html = "<html><body>In %s hour(s), it will be %s.</body></html>" % (offset, dt)
    return HttpResponse(html)
Finally, it’s obvious that much of this information is sensitive – it exposes the innards of your Python code and Django configuration – and it would be foolish to show this information on the public Internet. A malicious person could use it to attempt to reverse-engineer your Web application and do nasty things. For that reason, the Django error page is only displayed when your Django project is in debug mode. We’ll explain how to deactivate debug mode in Chapter 12. For now, just know that every Django project is in debug mode automatically when you start it. (Sound familiar? The “Page not found” errors, described earlier in this chapter, work the same way.)
What’s next?
So far, we’ve been writing our view functions with HTML hard-coded directly in the Python code. We’ve done that to keep things simple while we demonstrated core concepts, but in the real world, this is nearly always a bad idea.
Django ships with a simple yet powerful template engine that allows you to separate the design of the page from the underlying code. We’ll dive into Django’s template engine in the next chapter Chapter 4.
This work is licensed under the GNU Free Document License.